如何在 Snowflake 上构建可编程 AI Agent?Cortex Code Agent SDK 深度解析 | 技术实践
点击查看原文>
2026 年,智能体将在企业级应用中取得哪些实质性突破?点击下载《2026 年 AI 与数据发展预测》白皮书,获悉专家一手前瞻,抢先拥抱新的工作方式!
将 Cortex Code 从交互式 CLI 转变为一个可编程引擎,用于运行自主 AI 工作流。这些工作流既可以在你的本地机器上运行,也可以在 Snowflake 内部以服务端方式运行。
从“它在聊天里能用”到“它在生产环境里能用”的跨越,通常就是事情开始崩塌的地方。聊天适合一次性的代码片段,但它不是一种自动化策略。一旦你需要编排复杂任务,比如在服务端工作流中运行 Agent,或在 CI/CD 中运行 Agent,你需要的是一个可编程引擎,而不是一个文本框。
Cortex Code Agent SDK(或称 “CoCo” SDK)就是 Snowflake 对此给出的答案。它采用与 CLI 中相同的 Agentic 引擎,并将其封装成一个可编程接口。不是由你来驱动 Agent,而是由你的代码来驱动。如果你一直想启动一个真正能在服务端工作流中执行任务的 AI 助手,那么这就是你一直在寻找的工具包。
我们到底在说什么?
如果你最近一直在使用 Snowflake,你很可能已经见过 Cortex Code。它是 Snowflake 的 CLI Agent,不只是“建议”代码——它会真正围绕任务进行推理,读取你的本地文件,运行 SQL,并不断迭代,直到达成目标。
在底层,它正在调用 Claude Sonnet 4.6 或 OpenAI GPT-5.x 这类高端模型。SDK 只是为你提供了一种以编程方式接入这一循环的方法。
CLI 与 SDK:真正的区别
CLI 是给你用的:你坐在桌前,实时看着终端中的循环过程;
SDK 是适用于凌晨 2 点运行的 Python 脚本:需要检查 100 张表,优化一个视图,并在无需你盯着的情况下生成一份报告。
为什么要使用 SDK?
自动化是显而易见的答案,但真正的“为什么”归结为控制力:
可重复性:在一个庞大的代码库中运行同一个 Agentic 审计,而不必反复手动操作到手腕酸痛;
条件逻辑:你的 Python 代码可以为 Agent 设置“关卡”。例如:如果安全扫描发现高风险漏洞,就调用 Agent 来修复;如果没有,就直接继续;
结构化输出:你可以强制 Agent 返回类型化 JSON,而不是让它给你一段闲聊式的文字,这样你的下游代码才能真正使用这些数据;
自定义工具(MCP):你可以使用 Model Context Protocol 将 Agent 接入你的内部 API,例如 Jira 或 Slack。
SDK 将 Cortex Code 从一个人在环路中的助手,转变为一个由你的 Python 或 TypeScript 代码编排的可编程 Agentic 引擎。
使用场景
以下是 SDK 大放异彩的一些具体场景:
自动化代码审查:扫描每个 PR 中的漏洞、安全问题或风格违规,并返回结构化发现;
数据管道验证:在 ETL 运行后,让 Agent 检查表结构、验证数据质量,并生成报告;
语义视图优化:一个多轮管道,可检查 Snowflake 表,优化语义视图,创建搜索服务,并自主完成整合;
代码库迁移:分析文件中的弃用模式,并在整个代码仓库中应用修复;
机器学习中的特征工程:以 Agentic 方式探索数据集,生成候选特征,评估它们,并为模型选择最佳特征子集;
事件响应自动化:当告警触发时,让 Agent 读取日志、追踪问题,并提出修复方案。
准备基础环境
安装 CLI 和 SDK
你需要安装 CLI 和 SDK 包。安装 Cortex Code CLI:
curl -LsS https://ai.snowflake.com/static/cc-scripts/install.sh | sh从 PyPI 安装 SDK(Python ≥ 3.10):
pip install cortex-code-agent-sdk建立 Snowflake 连接
SDK 会复用你现有的 ~/.snowflake/connections.toml。这是一个很大的优势,因为你不需要管理一套新的凭据。
第 1 步:配置你的连接文件
创建或编辑 ~/.snowflake/connections.toml:
[dev-connection]account = "myorg-dev"user = "dev_user"authenticator = "externalbrowser" # Keeps things simple with SSOrole = "ENGINEER_ROLE"warehouse = "COMPUTE_WH"
第 2 步:验证你的连接是否可用
cortex --connection my-connection --print "G'day!"第 3 步:将连接传递给 SDK
from cortex_code_agent_sdk import query, CortexCodeAgentOptions# Explicit connection nameoptions = CortexCodeAgentOptions(connection="my-connection",cwd=".",)# Or omit 'connection' to use default_connection_name from the toml fileoptions = CortexCodeAgentOptions(cwd=".")
connection选项会直接映射到 CLI 的 --connection 标志。SDK 会生成 CLI 子进程,该子进程会使用指定的连接配置文件或默认连接配置文件进行身份验证。
最小可运行示例
import asyncioimport jsonasync def main():proc = await asyncio.create_subprocess_exec("cortex","-p", "What files are in this directory?","--output-format", "stream-json","--allowed-tools", "Read","--allowed-tools", "Glob","--allowed-tools", "Grep",stdout=asyncio.subprocess.PIPE,stderr=asyncio.subprocess.PIPE,)while True:line = await proc.stdout.readline()if not line:breaktext = line.decode().strip()if not text:continuetry:msg = json.loads(text)except json.JSONDecodeError:continueif msg.get("type") == "assistant":for block in msg.get("message", {}).get("content", []):if block.get("type") == "text":print(block["text"], end="")elif msg.get("type") == "result":print(f"\nDone: {msg.get('subtype', 'unknown')}")await proc.wait()asyncio.run(main())
两种 API 模式概览
在深入架构和示例之前,先快速了解使用 SDK 的两种主要方式:
单轮 —— 发送一个提示,消费 NDJSON(换行分隔 JSON)流,然后结束。
proc = await asyncio.create_subprocess_exec("cortex","-p", "Review utils.py for bugs. Fix any issues you find.","--output-format", "stream-json","--allowed-tools", "Read","--allowed-tools", "Edit","--allowed-tools", "Glob","--allowed-tools", "Grep",stdout=asyncio.subprocess.PIPE,stderr=asyncio.subprocess.PIPE,)# ... parse NDJSON lines from proc.stdout
多轮 —— 通过生成顺序 CLI 调用来串联多个提示,或使用 SDK 客户端实现持久会话。
## Turn 1proc1 = await asyncio.create_subprocess_exec("cortex","-p", "Inspect the schema and optimise the semantic view","--output-format", "stream-json","--allowed-tools", "Read", "--allowed-tools", "Glob","--allowed-tools", "Grep", "--allowed-tools", "Edit",stdout=asyncio.subprocess.PIPE,stderr=asyncio.subprocess.PIPE,)# ... parse NDJSON lines from proc1.stdoutawait proc1.wait()## Turn 2: Launch another agent that builds on the file changes from Turn 1proc2 = await asyncio.create_subprocess_exec("cortex","-p", "Now create search services for text columns","--output-format", "stream-json","--allowed-tools", "Read", "--allowed-tools", "Write","--allowed-tools", "Glob", "--allowed-tools", "Grep",stdout=asyncio.subprocess.PIPE,stderr=asyncio.subprocess.PIPE,)# ... parse NDJSON lines from proc2.stdoutawait proc2.wait()
它实际运行在哪里?
一个关键的架构要点是,Cortex Code Agent SDK 可在两种环境中运行,让你能够灵活部署自己的 Agentic 工作流。
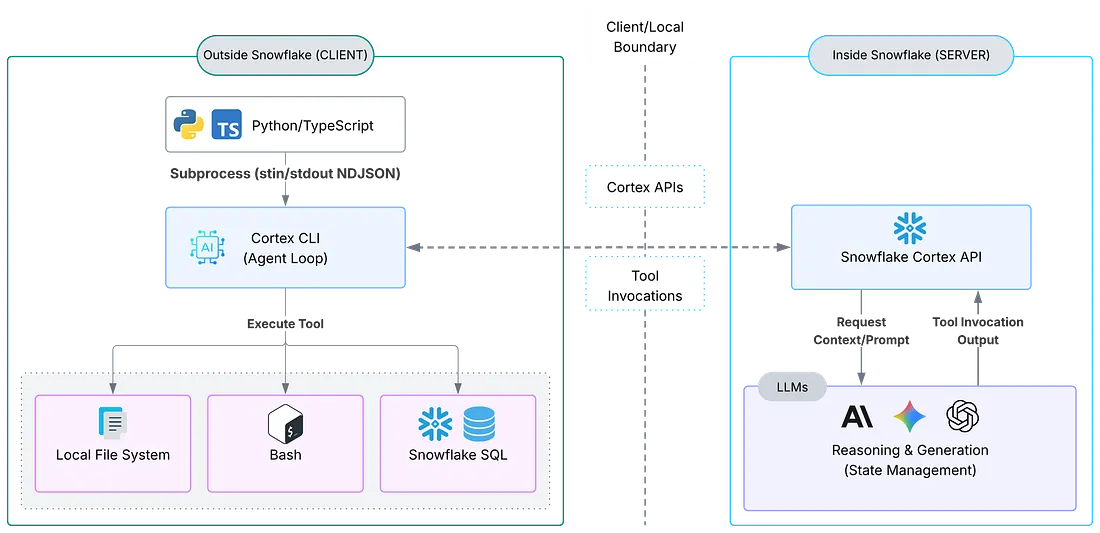
Agentic 工作流
客户端侧(Snowflake 外部)
这是指任何由你控制、但并非 Snowflake 本身的环境——你的笔记本电脑、虚拟机、GitHub Actions runner、Docker 容器。你的 Python 或 TypeScript 脚本在那里运行,SDK 会将 Cortex CLI 作为子进程启动,通过 stdin/stdout 使用 NDJSON 流进行通信,而 CLI 则负责完整的 Agent 循环,包括通过 Snowflake Cortex 调用 LLM。
何时使用:开发工作流、CI/CD 管道、本地自动化脚本,以及任何需要访问项目目录文件系统的场景。
服务端侧(Snowflake 内部)
SDK 也可以在 Snowflake 内部运行。例如,在 Snowpark Container Services(SPCS)容器、Snowflake Notebook 或 Stored Procedure 中运行。在这种模式下,Agent 会作用于服务端资源,例如 Snowflake stage、内部表和 Snowflake 托管文件。
何时使用:以数据为中心的工作流,其中 Agent 需要操作 Snowflake 原生资源;对治理敏感、数据不应离开 Snowflake 的环境;或完全在平台内部运行的计划任务。
SDK 架构
理解架构有助于你推理当代码调用query() 或创建 CortexCodeSDKClient时会发生什么。完整图景如下:
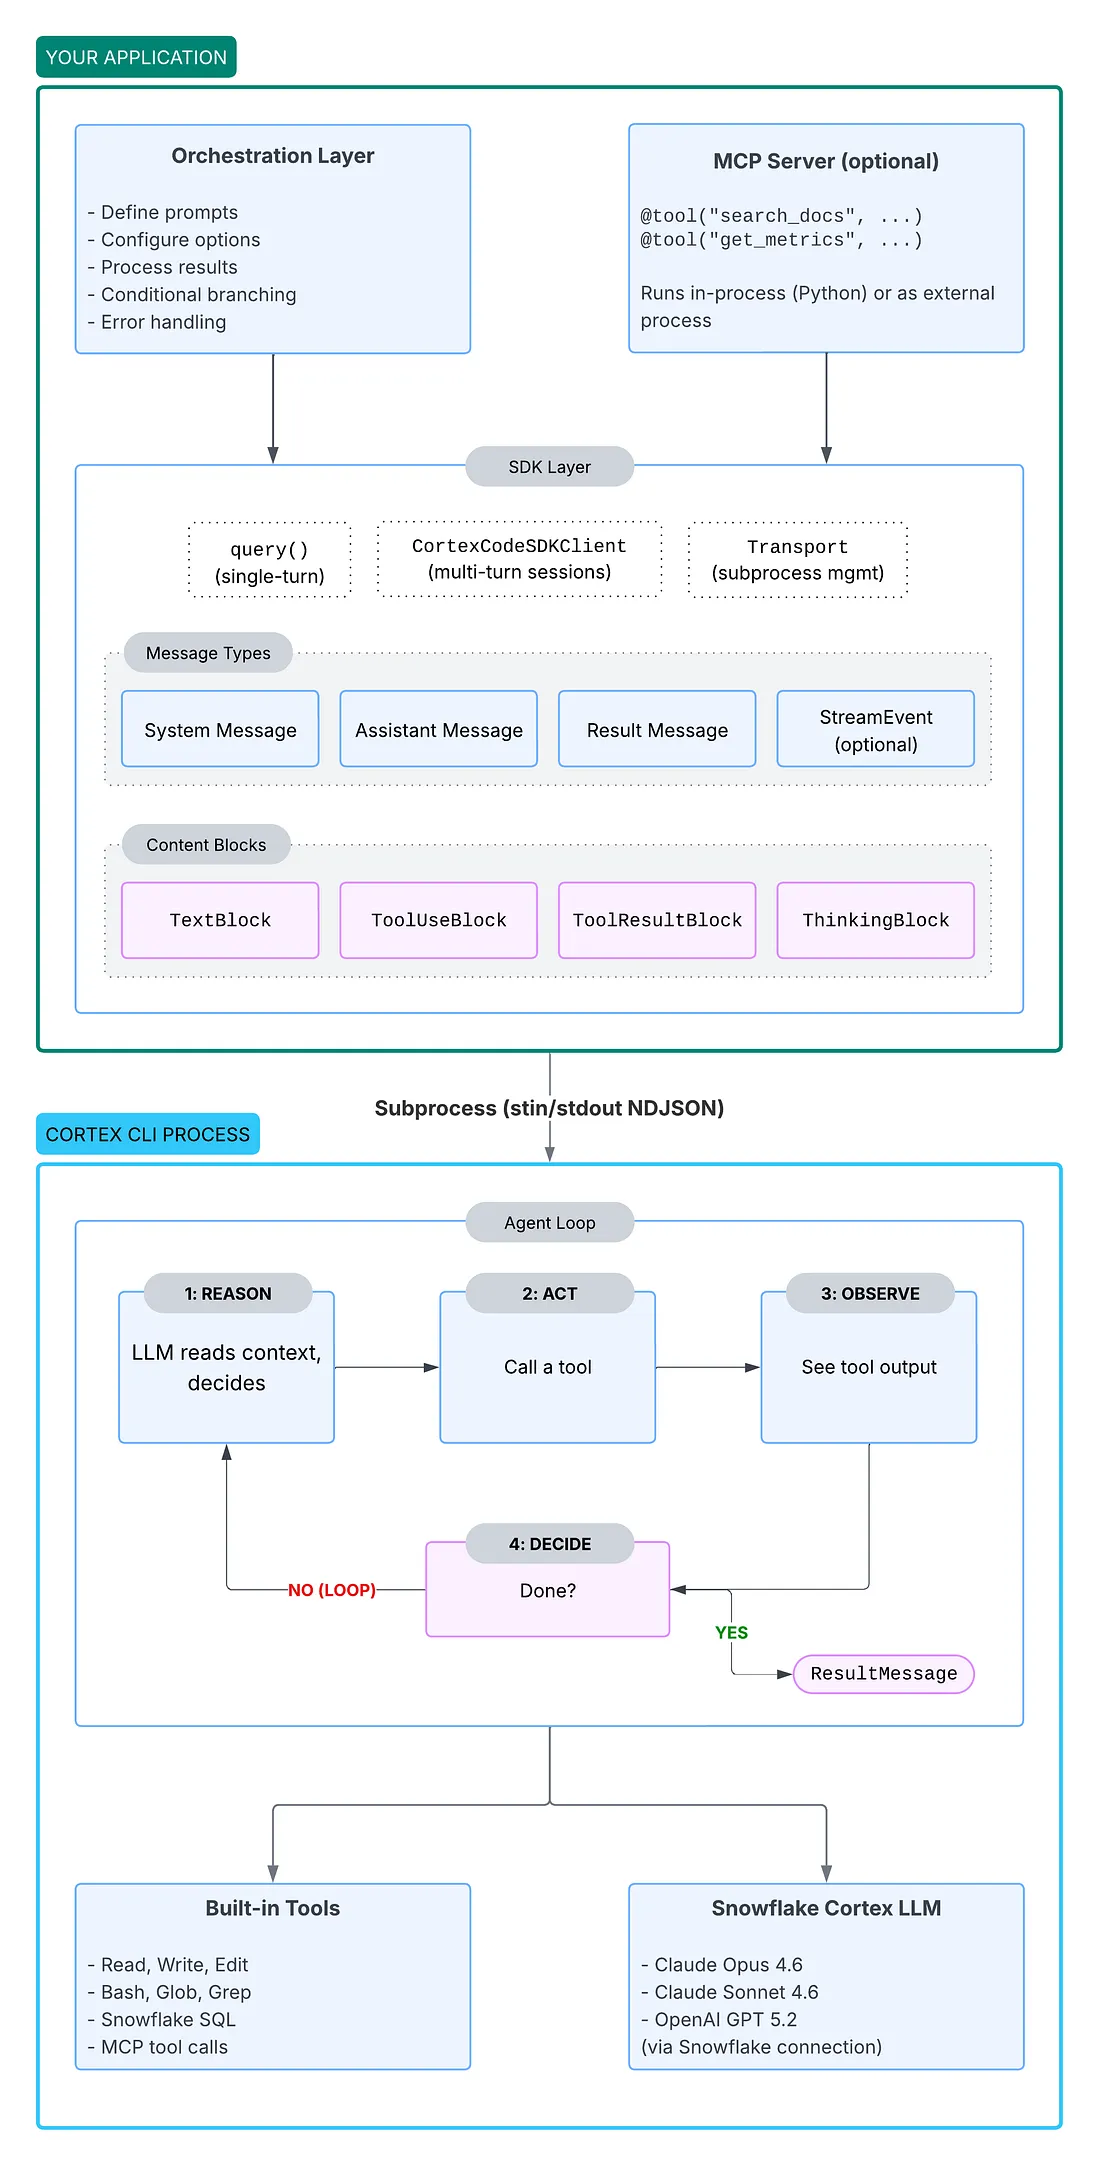
Cortex Code SDK 架构
关键架构概念
子进程通信
你的代码永远不会直接与 LLM 对话。SDK 会将 Cortex 作为子进程启动,并通过 stdout 上的 NDJSON 流进行通信。每一行都是一条带类型的消息——SystemMessage、AssistantMessage、ResultMessage 或 StreamEvent。
Agent 循环
当你发送一个提示时,Agent 会进入一个自主推理循环:
推理:LLM 读取上下文并决定要做什么;
行动:Agent 调用一个工具(读取文件、执行 SQL、编辑代码……);
观察:Agent 查看工具的输出;
决策:任务完成了吗?如果没有,就回到“推理”。
像“修复 code.py 中的 bug”这样的单个提示,可能会触发多次迭代,包括读取文件、识别问题、应用修复、验证编辑。
你控制 vs. Agent 决策
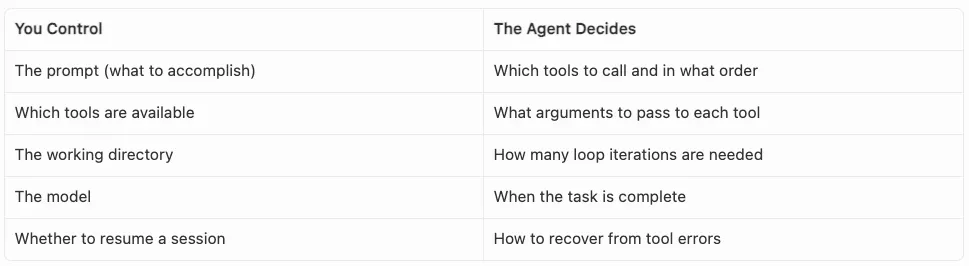
控制与决策
权限模型
SDK 对工具执行提供细粒度控制:
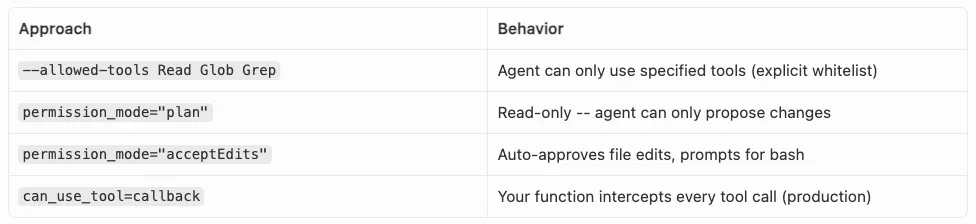
对工具执行的控制
消息流
每次交互都会生成你可以消费的带类型消息:
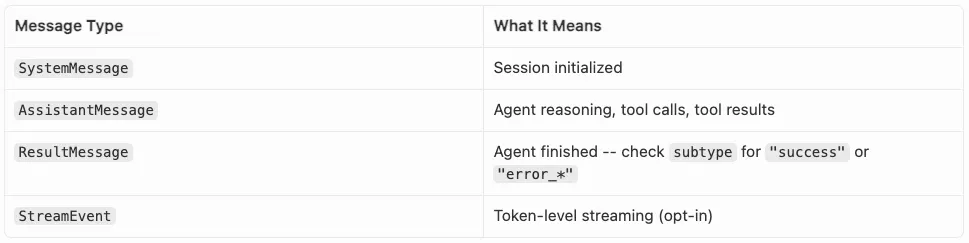
带类型消息
AssistantMessage包含内容块:TextBlock(推理文本)、ToolUseBlock(工具调用)、ToolResultBlock(工具输出)或 ThinkingBlock(思维链)。
Skills 继承可用
Cortex Code 附带一套内置 Skills 库。这些 Skills 并不是交互式 CLI 独有的。当你通过 SDK 运行 Agent 时,完整的 Skills 集仍然可用。如果某个提示匹配某项 Skill 的领域,Agent 会像在终端会话中一样激活它。

MCP 集成
SDK 支持 Model Context Protocol,用于自定义工具。在 Python 中,你可以使用 @tool 装饰器和 create_sdk_mcp_server() 内联定义工具,该函数会在同一进程中运行一个 MCP 服务器(不需要外部服务器)。请注意,截至该 SDK 版本,MCP 是自定义工具集成唯一受支持的路径。
示例 1:“放手不管”的 Bug 猎手
我想看看,是否可以把 SDK 指向一个有问题的脚本,让它在没有任何人工干预的情况下“自动修复”代码。我使用了一个简单的 buggy_calculator.py,里面包含一些经典的 ZeroDivisionError 和 KeyError 陷阱。
有 Bug 的文件
创建 buggy_calculator.py:
# buggy_calculator.pyimport jsonfrom datetime import datetimedef calculate_average(numbers):total = 0for num in numbers:total += numreturn total / len(numbers) # Bug: ZeroDivisionError on empty listdef parse_user_config(config_string):config = json.loads(config_string)return {"username": config["user"]["name"].strip(), # Bug: KeyError if "user" or "name" missing"timeout": int(config["settings"]["timeout"]), # Bug: KeyError if nested keys missing"created": datetime.strptime(config["metadata"]["created_at"], # Bug: KeyError if key missing"%Y-%m-%d"),}def find_outliers(data, threshold):mean = sum(data) / len(data) # Bug: ZeroDivisionError on empty liststd_dev = (sum((x - mean) ** 2 for x in data) / len(data)) ** 0.5 # Same bugreturn [x for x in data if abs(x - mean) > threshold * std_dev]def merge_sorted_lists(list_a, list_b):result = []i, j = 0, 0while i < len(list_a) and j < len(list_b):if list_a[i] <= list_b[j]:result.append(list_a[i])i += 1else:result.append(list_b[j])j += 1# Bug: remaining elements from both lists are never appendedreturn result
Agent 脚本
该脚本会将 Cortex Code CLI 作为子进程调用,在 Agent 查找并修复每个 Bug 的同时,实时流式输出 NDJSON:
# fix_bugs.pyimport asyncioimport jsonPROMPT = """Review the file buggy_calculator.py for bugs that would cause crashes or incorrect results.For each bug you find:1. Explain what the bug is and when it would trigger2. Fix the bug in the fileBe thorough -- check for edge cases like empty inputs, missing keys, and incomplete logic."""async def main():print("Agent starting bug analysis...\n")proc = await asyncio.create_subprocess_exec("cortex","-p", PROMPT,"--output-format", "stream-json","--allowed-tools", "Read","--allowed-tools", "Write","--allowed-tools", "Edit","--allowed-tools", "Glob","--allowed-tools", "Grep","--allowed-tools", "Bash",stdout=asyncio.subprocess.PIPE,stderr=asyncio.subprocess.PIPE,)while True:line = await proc.stdout.readline()if not line:breaktext = line.decode().strip()if not text:continuetry:msg = json.loads(text)except json.JSONDecodeError:continuemsg_type = msg.get("type")if msg_type == "assistant":content = msg.get("message", {}).get("content", [])for block in content:if block.get("type") == "text":print(block["text"], end="")elif block.get("type") == "tool_use":print(f"\n> Tool: {block['name']}")elif msg_type == "result":subtype = msg.get("subtype", "unknown")duration = msg.get("duration_ms", 0)if subtype == "success":print(f"\n\nAll bugs fixed successfully. ({duration}ms)")else:print(f"\n\nAgent finished with status: {subtype} ({duration}ms)")await proc.wait()asyncio.run(main())
当你运行 python fix_bugs.py 时,Agent 会:
读取
buggy_calculator.py以理解代码;推理每个函数并识别边界情况;
多次编辑文件——添加空列表保护、使用
.get()安全访问键,并在merge_sorted_lists中追加剩余元素;报告它修复了什么以及原因。
你可以实时看到完整的推理流、工具调用和编辑过程。修复后的文件会被写回磁盘(无需人工干预)。
下面是 Agent 生成的内容(为清晰起见,推理部分有所缩写):
Agent starting bug analysis...I'll review buggy_calculator.py for bugs that could cause crashes or incorrect results.> Tool: ReadI've read the file. Let me analyse each function for bugs.**Bug 1: `calculate_average` -- ZeroDivisionError on empty list**The function divides by `len(numbers)` without checking if the list is empty.When called with `calculate_average([])`, this crashes with `ZeroDivisionError`.> Tool: EditFixed: Added an early return for empty lists:if not numbers:return 0**Bug 2: `parse_user_config` -- KeyError on missing nested keys**The function accesses `config["user"]["name"]`, `config["settings"]["timeout"]`,and `config["metadata"]["created_at"]` directly. If any of these keys are missing,it raises `KeyError`.> Tool: EditFixed: Replaced direct key access with `.get()` and sensible defaults:user = config.get("user", {})settings = config.get("settings", {})metadata = config.get("metadata", {})**Bug 3: `find_outliers` -- ZeroDivisionError on empty list**Same pattern as `calculate_average` -- `sum(data) / len(data)` crashes on empty input.> Tool: EditFixed: Added an early return for empty data lists.**Bug 4: `merge_sorted_lists` -- remaining elements never appended**After the `while` loop exits, any remaining elements in `list_a` or `list_b` aresilently dropped. For example, `merge_sorted_lists([1, 3, 5], [2, 4])` returns`[1, 2, 3, 4]` instead of `[1, 2, 3, 4, 5]`.> Tool: EditFixed: Added `result.extend(list_a[i:])` and `result.extend(list_b[j:])` after the loop.All bugs fixed successfully. (12850ms)
示例 2:面向机器学习的 Agentic 特征工程与选择
对于更复杂的工作,例如特征工程,一个提示通常是不够的。如果你试图一次性做太多事情,最终会出现“上下文漂移”。更好的方式是把它拆成多个回合。
我们来构建一个客户流失预测模型。你有一个原始数据集,需要从原始列出发,得到一个经过排序和验证的特征集,但你不想手动编写每一个转换。相反,你让 Agent 探索数据、工程化候选特征、评估它们,并以结构化 JSON 的形式返回最终排序后的特征列表。
数据集
创建 customer_churn.csv,这是一个包含 10 列的简化数据集:
customer_id,tenure_months,monthly_charges,total_charges,contract_type,payment_method,num_support_tickets,has_online_security,has_tech_support,churnedC001,12,64.50,774.00,month-to-month,credit_card,3,0,0,1C002,48,89.20,4281.60,one_year,bank_transfer,0,1,1,0C003,3,29.99,89.97,month-to-month,credit_card,5,0,0,1C004,72,105.00,7560.00,two_year,auto_pay,1,1,1,0C005,1,45.00,45.00,month-to-month,credit_card,2,0,0,1...
在实践中,这会是数百或数千行,通过基于样本记录合成生成更多记录。列中混合了数值、分类和二进制数据——这正是能够从自动化特征工程中受益的那类复杂输入。
编排脚本
这是完整的管道脚本。它定义了一个可复用的 run_agent_turn() 辅助函数,该函数会将 Cortex Code CLI 作为子进程启动,并使用 --output-format stream-json 和 --allowed-tools,从 stdout 逐行读取 NDJSON 消息,并返回解析后的结果,包括任何结构化 JSON 输出。随后,main() 函数会运行四个连续回合,并在每个回合之间使用 Python 决策逻辑来控制管道是继续还是中止。
# ml_feature_pipeline.pyimport asyncioimport json# Tools the agent is allowed to use across all turns.ALLOWED_TOOLS = ["Read", "Write", "Edit", "Glob", "Grep", "Bash"]# JSON Schema for the final structured output -- Turn 4's response# must conform to this shape.FEATURE_SCHEMA = {"type": "object","properties": {"target_column": {"type": "string"},"selected_features": {"type": "array","items": {"type": "object","properties": {"name": {"type": "string"},"importance_score": {"type": "number"},"category": {"type": "string","enum": ["original", "engineered"],},"rationale": {"type": "string"},},"required": ["name", "importance_score", "category", "rationale"],},},"dropped_features": {"type": "array","items": {"type": "object","properties": {"name": {"type": "string"},"reason": {"type": "string"},},"required": ["name", "reason"],},},},"required": ["target_column", "selected_features", "dropped_features"],}async def run_agent_turn(prompt: str, output_schema: dict | None = None) -> dict:"""Run a single agent turn via the cortex CLI and return parsed results.Returns a dict with:- "text": concatenated assistant text blocks- "result_subtype": "success" | "error" | ...- "duration_ms": execution time- "structured_output": parsed JSON if output_schema was provided, else None"""cmd = ["cortex", "-p", prompt, "--output-format", "stream-json"]for tool in ALLOWED_TOOLS:cmd.extend(["--allowed-tools", tool])if output_schema:cmd.extend(["--output-format-json-schema", json.dumps(output_schema)])proc = await asyncio.create_subprocess_exec(*cmd,stdout=asyncio.subprocess.PIPE,stderr=asyncio.subprocess.PIPE,)text_parts = []result_subtype = "unknown"duration_ms = 0structured_output = Nonewhile True:line = await proc.stdout.readline()if not line:breaktext = line.decode().strip()if not text:continuetry:msg = json.loads(text)except json.JSONDecodeError:continuemsg_type = msg.get("type")if msg_type == "assistant":content = msg.get("message", {}).get("content", [])for block in content:if block.get("type") == "text":text_parts.append(block["text"])print(block["text"], end="")elif block.get("type") == "tool_use":print(f"\n> Tool: {block['name']}")elif msg_type == "result":result_subtype = msg.get("subtype", "unknown")duration_ms = msg.get("duration_ms", 0)本文来源:InfoQ